[안드로이드] - 당겨서 새로고침 SwipeRefreshLayout
[안드로이드] - Pull to refresh 당겨서 새로고침 (SwipeRefreshLayout)
당겨서 새로고침 (pull to refresh) 는 많은 APP에서 만날수 있는 친숙한 패턴입니다.
‘구글 가이드’에도 수동으로 동기화 하는 방법 중 제스처를 통해 내용물 갱신을 시작하도록 요구합니다.
이 패턴을 구현한 수많은 라이브러리가 있지만 구글에서 제공하는 가장 간단한 라이브러리를 구현하는 방법에 대해 설명해드리겠습니다.
1. Result

2. Step by Step
2-1. 라이브러리 추가
SwipeRefreshLayout 를 통해 당겨서 새로고침을 구현하기 위해 추가해야할 라이브러리는 ‘com.android.support:design’ 라이브러리입니다. 예제에서 RecyclerView 위에서 ‘ pull to refresh ’ 제스쳐를 실행할거라
추가 라이브러리도 dependencies 에 넣어줬습니다.
핵심 라이브러리는
compile 'com.android.support:design:25.3.1'
입니다.
build.gradle (Module:app)
dependencies {
    compile fileTree(dir: 'libs', include: ['*.jar'])
    androidTestCompile('com.android.support.test.espresso:espresso-core:2.2.2', {
        exclude group: 'com.android.support', module: 'support-annotations'
    })
    compile 'com.android.support:appcompat-v7:25.3.1'
    compile 'com.android.support:recyclerview-v7:25.3.1'
    compile 'com.android.support.constraint:constraint-layout:1.0.2'
    compile 'com.android.support:design:25.3.1'
    testCompile 'junit:junit:4.12'
}
2-2. Layout componet
라이브러리 추가 후, Layout 에서 android.support.v4.widget.SwipeRefreshLayout 추가해줍니다.
정말 사용법이 간단해서 RecyclerView를 담아주기만 하면 됩니다.
activity_main.xml
<?xml version="1.0" encoding="utf-8"?>
<layout xmlns:android="http://schemas.android.com/apk/res/android">
    <RelativeLayout
        android:layout_width="match_parent"
        android:layout_height="match_parent">
        <android.support.v4.widget.SwipeRefreshLayout
            android:id="@+id/swipeRefreshLo"
            android:layout_width="match_parent"
            android:layout_height="match_parent">
            <android.support.v7.widget.RecyclerView
                android:id="@+id/recyclerView"
                android:layout_marginTop="8dp"
                android:layout_width="match_parent"
                android:layout_height="match_parent"/>
        </android.support.v4.widget.SwipeRefreshLayout>
    </RelativeLayout>
</layout>
2-3. Java code
SwipeRefreshLayout 중 자바에서 처리해야할 부분은 OnRefreshListener 입니다. 구현 방법은 많지만 제가 편한 방법으로 소개해드리겠습니다.
먼저 class 에 Listener 를 implements 해줍니다.
public class MainActivity extends AppCompatActivity implements SwipeRefreshLayout.OnRefreshListener
onRefresh() 메서드를 Override 합니다. 전 Refresh가 시작되면 SnakBar 를 표시해주고, 0.5 초후 Refresh가 완료되도록 하였습니다.
setRefreshing(false) 메서드가 호출 되면 새로고침이 완료됩니다. 특정 작업이 완료되는 시점에 사용해주시면 됩니다.
@Override
public void onRefresh() {
    mainBinding.recyclerView.postDelayed(new Runnable() {
        @Override
        public void run() {
            Snackbar.make(mainBinding.recyclerView,"Refresh Success",Snackbar.LENGTH_SHORT).show();
            mainBinding.swipeRefreshLo.setRefreshing(false);
        }
    },500);
}
그 다음 layout 에 정의해둔 이름으로 SwipeRefreshLayout 를 호출하고 위에서 정의한 Listener 를 this를 통해 할당해줍니다.
Refresh 할 때 돌아가는 progress circle의 색상도 바꿀수 있는데 2번 째 줄에 있는 setColorSchemeColors 메서드를 통해 바꿀수 있습니다.
private void setRefresh(){
mainBinding.swipeRefreshLo.setOnRefreshListener(this);
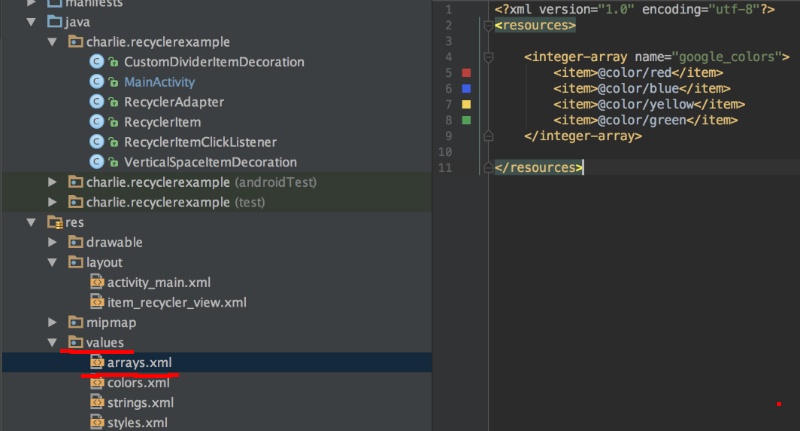
mainBinding.swipeRefreshLo.setColorSchemeColors(getResources().getIntArray(R.array.google_colors));
}
색상 바꿀 때 사용하는 arrays.xml 은 values 폴더 아래 있습니다.
AndroidSwipe Refresh LayoutPull to refresh
2017-05-16 09:00 +0900